TT Toughpower 700W
Sep 8th, 2006 | By Archive
TT Toughpower 700W
Date
: 09/8/06 – 03:19:04 AM
Author
:
Category
: Power Supplies
Page 1 : Index
Manufacturer:
Thermaltake Technology Co., Ltd
Price:
$165.99 (Newegg.com)
When you here the name Thermaltake, often referred to as TT, you generally think of cooling accessories. Perhaps if you are new to the enthusiast world of exotic cooling and fancy LEDs, you think of the signature Thermaltake cases such as the Armor and Tai-Chi case. Water-cooling has been the largest expanding cooling solution for computers and Thermaltake has embraced water cooling with many kits and products. Today, however, we are not talking about water cooling, we are talking about power supplies.
The engine of the computer, the catalyst to all the action, the power supply is one thing you can't have a computer without. The Toughpower line of power supplies has evolved over the years and while mainly being a cost effective solution at the lower wattage end of the scale, the higher end 600W Toughpower was regarded as a monster a few years ago and now doesn't even make a mark on the map. Power supplies have grown increasingly lager with the increasing demands of computer components and that is why there are now 700W Toughpower models and 750W modular models.

Today we look at the 700W version of the TT Toughpower ATX switching power supply. It is not the largest, with the already mentioned 750W versions holding that title, but is still a solid looking unit that will be forced to endure the same testing method that I laid out for the OCZ GameXStream. Will a pair of 7900GTXs and a beastly dual-core AM2 CPU be enough to stop the Toughpower? Keep reading to find out…
Page 2 : Package
Thermaltake has been selling this stuff for so long that any package they put out is well thought out and well executed.

The Toughpower 700W box is no different than those in the past. It has a nice bright and esthetically pleasing design but not flashy or over the top technical. Wrapped in plastic you are guaranteed a factory fresh power supply when you take this home from the store.

Right off the bat TT has started filling our eyes with information which is a welcome sight in this reviewers mind. Too often we get flashy graphics and no content. Thermaltake balances the drifting sports car with details relevant to the product.

The serene cloud theme wraps around the package where the model details of the power supply are indicated as well as the serial and UPC stickers. Notice under the Toughpower 700W title, it states 14cm fan. This is a bit unique as the standard has been 120mm but bigger generally means better in the world of fans.

The other side of the package is host to a long list of features that the Toughpower 700W offers. I won't bother listing or discussing them here as these will be covered in the specifications section on the next page. An amperage chart is also easily found on this side.

Twisting around to the back shows more clouds, information, and this time, plenty of photos too. Along the bottom, TT uses badges to list important features including the one on the end claiming 56A combined on the 12V rails.

A close up of the back images reveals the complete connector information for us which is very nice to see on the back of a PSU box. Thermaltake has been doing this on the Toughpower series for a long time now. We can also clearly see nicely sleeved cables for easy management.

No Thermaltake package would be complete without a handle at the top for easy transportation. It can also turn the package into a weapon for self defense purposes only. I would also leave the power supply in the package if it is being used for this purpose.
Page 3 : Specifications
Between what we have already seen on the package and what Thermaltake provides at their web site, it is tough to not know everything about the product by the time we leave this page.

I start with a chart of the wattage and amps that each rail is capable of supplying. We can see the standard 18A listed for Max. Load for each of the 4 12v rails. What is not listed is a Peak Load so I am not sure exactly what max means. Usually peak means the maximum and Max means the maximum sustainable. Without a peak load indication it is tough to tell. Here now is a list of features that Thermaltake has listed at their web site:
- SLI, Cross-Fire, and Dual Core CPU ready
- Next generation four +12V rails(12V1, 12V2, 12V3, 12V4) supports high-end graphic card and PC system (combined loading of 56A)
- Independent Voltage Circuit: offers unflappable current delivery under heavy load and makes voltage output more stable
- Active Power Factor Correction (PF>0.99) and high efficiency (up to 85%)
- Extremely good voltage regulation (±3%): provides steady voltage for system
- Industrial grade components (capacitor, transformer, etc)
- High reliability: MTBF>120,000 hours
- Mirror effect housing and reliable 14cm ball-bearing fan
- Protections: Over Current, Over Voltage, and Short-Circuit protection
- Safety / EMI Approvals: CE, CB, TUV, FCC, UL, CUL, and BSMI certified
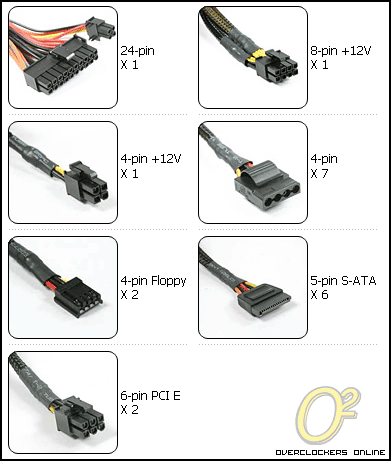
And I have taken that information one step further with exact lengths of cables from connector base to connector base. Here they are:
Cable Lengths:
as measured from the connector base to the PSU box.
1X 20/24 Pin Motherboard Connector
|————19"
|————>>
1X 4/8 Pin +12V CPU Connector
|————19"—-6"
|————>>>>—>>
1X 4 X 4 Pin Molex Connectors + 1 X 4 Pin Floppy Power Connectors
|————20"—6"—-6"—-6"—-6"
|————>>—->>—->>—->>—->>
1X 3 X 4 Pin Molex Connectors + 1 X 4 Pin Floppy Power Connectors
|————20"—6"—-6"—-6"
|————>>—->>—->>—->>
2X 3 X 5 Pin SATA Connectors
|————20"—6"—-6"
|————>>—->>—->>
2X 6 Pin PCI Express Connectors
|——————19"
|——————>>
I leave you with one more list of specifications from the Thermaltake site:

I would also recommend visiting their web site as they have some other charts with data about fan speed versus output as well as efficiency charts.
Page 4 : Package Contents
I have here another power supply in a small thin box which means no excessive padding inside. When power supplies shipped like this I thought it was risky but after receiving a half dozen or so in this type of package all in perfect shape, my view has changed.

What I mean by no excessive packaging is that the power supply is wrapped in bubble wrap and slid in the box with the cables tucked to the side like seen here. Accessories are then piled on top.

Those accessories on top include the manual, a box with a power cord in it and one additional piece, a rubber or silicon basket I would imagine for reducing vibration.

As I stated, the power supply itself is just wrapped in thin bubble wrap with the cords secured to the rear at the exit point. Every power supply I received packaged like this shows up in perfect shape and I expect no less with this Thermaltake unit.

Un-doing the cable tie holding the connections together releasing an expanding of bulk and the result reminds me very much of the OCZ GameXStream cable bundle. Black sleeving and heat shrink wrapping at the ends.

Upon further inspection, the differences between this heat shrink ends and those on the OCZ GameXStream or the Silverstone Zeus 560W is that there are no cable ties underneath and the heat shrink is very loose. It is a minor detail but there is a likely chance that the sleeving will come loose and some point with ends like this.

As for the connectors themselves, very nicely done with easy to read labels and the heat shrink does go fairly close to the connections which I like. We already know what connections are here so I won't bother separating them for individual mug shots.

The two lines of molex connections provide us with 7 total outlined in specifications. I like the idea of giving 3 molex connections on one line and 4 on the other with a floppy on each. This is the most logical and it keeps the total cable count to a minimum.

The SATA power connections have an equal 3 connection on each line. These cables are easy to manipulate so I am happy with that type of setup. Maybe a 4 and 2 wouldn't be bad either but I haven't spent a lot of time thinking about how that might play out in different setups.

The unit is finished in a reflective yet flat black finish. It is tough to describe because it does reflect light well and therefore sharp images but it still feels and looks flat black and not glossy like a Thermaltake piano black case.

The label provides the same numbers as on the package but in less detail. The amps for each rail are shown and that gives us the jist of what it is pushing.

The exterior side which will face the fresh air in most all cases is the popular honeycomb design that these single fan power supplies must have in order to exhaust the air being forced through the unit by the fan on the underside. Having an active PFC means that there is no need for a 115~220v switch which doesn't exist here.

At the other end I wished I would have seen the sleeving go into the power supply as that just gives such a clean look back there. This isn't normally a visible area in most cases so it is no big deal but its just one of those little things that could be different.

That leads us to this 140mm fan which looks just like a 120mm fan but is obviously slightly larger. How much of a difference will that 20mm make in providing ample cooling but maintaining a low noise level? It is tough to say but every little bit helps. I will now cut the warranty sticker and void my warranty to take a look inside.

With 4 screws I can pop the top and reveal the fan from the inside. It is naturally a Thermaltake fan part number
TT-1425B
. The sticker lists it at 12v 0.70A. I found the specs to be a 1900RPM fan pushing 82CFM at that speed but is thermally controlled. I did a brief test and after power on the unit, the fan does spin up but doesn't make much to any noise at all. During testing I will see if I can hear it spinning faster.

The cables coming into the power supply are very tidy and nicely heatshrunk at their connections on the PCB. We also get our first look at one of the smaller capacitors, a Samxon which isn't a Japanese made capacitor but uses the same formula and process. Samxon high quality caps are up there with the best but they also make mid-range ones as well. I am not sure which line these come from.

It was easy to identify the manufacturer of this power supply with the CWT marking on the top of the smaller transformer. CWT stands for Chainwell Technology. I am assuming I can easily find more CWT markings to further identify the Chainwell part number.

Again on the main transformer and along the edge of the green PCB we see CWT CO Ltd. I couldn't find any other info about these components based on part numbers. Either way, that is clearly who is making this unit for Thermaltake.

The main capacitor is a large 400V Rubycon and there are also some smaller caps that look to be Rubycon. All I could find is Rubycon and the green Samxon capacitors in this power supply.

The layout is decent and the quality of the work inside looks to be very good with good quality components. I expect this power supply to perform admirably under the heavy load. The heatsinks are pretty basic and composed of what feels like poor quality aluminum but with that large fan overhead I can't see the temperatures getting too much over 40C-50C in here.
Page 5 : Installation
I decided that I would change things up and use my daily rig as the platform in which I would install the Toughpower 700W. It is a challenge as my daily rig is housed in a micro-ATX Silverstone case, the TJ-08.

So I stripped the power supply from the case and I am left with a 2 hard drive, 1 optical drive setup and a large CPU cooler already in place. Getting the power supply in is the first order of business and doing that without taking out the motherboard might not happen.

Thankfully enough, I was wrong. The small size of the Toughpower allowed it to slip right in place with a bit of wiggling. There is actually a good bit of room behind the optical drive so getting the power cables where I want them won't be an issue.

I start with the 24-pin ATX connection to the motherboard. It is easily snaked in behind the drive tower and then out to the motherboard edge. The cables are firm yet flexible and nice to work with. The sleeving is a treat of course.

Next it was time to power accessories so I move to the hard drives after hooking up the CPU 4-pin connection. The way the Toughpower SATA power connections run worked out perfect for this setup and allowed a very clean connection. I ran the cable across from the PSU to the empty 5.25" bay and then down the front of the TJ-08 to come out in the hard drive area.

After some hand wiggling and finger scraping I managed to connect and clean up the connections quite nicely. The backside shows where all the hiding took place and is ready for its panel.

With the back panel secured I turn the case around and admire my handy work. Really, I found no issues with the cables and thought it the install went quite well and ended up relatively clean despite the given space.

I know the case is the reason for 80% of a clean looking case but cables and cable management does play a role and if you have a power supply with cables that are not playing nice, cable management suffers. That is clearly not the case with the Toughpower series of power supplies.
Page 6 : Performance & Testing
Despite having just gone through the installation of the power supply in a case, I will be conducting the testing as I normally do on my test bench. I just finished testing the OCZ GameXStream 700W for two weeks with this setup and wil simply unplug that unit and slip the Thermaltake Toughpower 700W in its place. The setup is the same, the hardware is the same, and the testing method will be the same. If similar results are achieved then this power supply will join very good company that is capable of running a very heavily loaded and power hungry system.

I will simply be running this system under 100% load for weeks and documenting the rail voltages frequently throughout the testing period. Readings from various days will be pulled and added to the results. This will give us a good idea of how each rail held up not only from idle to various load conditions but also how well they did over the testing period of two weeks.
Asus M2N32-SLI Deluxe Wifi.
AMD Athlon64 X2 3800+ @ 2.8GHz 1.424v (LDB4F 0621)
Asetek WaterChill Xtreme
2 X BFG 7900 GTX OC 512MB SLI @ 670MHz Core / 820MHz Mem
OCZ PC-7200 2048 Platinum XTC EPP @ DDR932 (4-4-3-5 2.3v)
36.6GB WD Raptor 10,000RPM
Windows XP Pro + Latest Updates
Test bench setup
Power Supply:
Thermaltake Toughpower 700w
24-Pin ATX

You will notice that the +12v rails are not labeled +12v1 or +12v2 as I don't know which cables are on which rails. The +12v rail supplying the motherboard shows no signs of decline over the two week period and the delta between idle and load is slim to nil. That same statement holds true for the +3.3v and +5v rails as well with both of them showing very little delta and no drop was seen over the testing period.
4-Pin CPU

I anticipate the CPU has its own rail separate from the main ATX connections and these numbers are showing slightly different results too. Unlike the ATX +12v rail, the CPU +12v rail does display a small delta between idle and load, but again the difference is so small and at most, the +12v rail drops 0.07v. That is less than half a percentage point!
6-Pin PCI-E 1

With the CPU +12v rail holding its own with a big dual core CPU over volted and over clocked, I fully expected that both video cards would be able to run just fine as well because I suspect them to be on their own +12v rail as well. The results above are a lot stronger than I thought.
6-Pin PCI-E 2

Like the other PCI-E connection, this +12v rail is rock solid showing virtually no delta at all from full 3D load to idle. This power supply certainly appears to be ready for next generation video cards and any pair that is out there today. Dreams of quad-SLI waft into my head briefly before I wake up and continue on.
4-Pin Molex

The last of the cables I took readings from was one of the 4-pin Molex connectors. I suspect that the accessories powered by the 4-pin molex and 5-pin SATA power connectors share their +12v rail with the 24-pin motherboard connector. I did not load this rail that much but with the hard drive, water pump, and eight 120mm fans connected it certainly was loaded.
Page 7 : Conclusion
I think it is safe to say that Thermaltake has done well with this ToughPower 700W power supply. It certainly had no problem with the testing and I must say that I truly tried to make the power supply fail. Hundreds of 3DMark runs were made and endless hours of gaming couldn't budge any rail on this power supply. The compact size also makes this power supply an easy choice for any system build.

A few small things like the finishing on the cable sleeving with the loose heat shrink and lack of cables ties are just minor drawbacks when compared to the solid performance that this power supply displayed. Cable lengths could be just a pinch longer but the cable selection is near perfect.
There are many options right now for power supplies in this range both price wise and for power output but Thermaltake has shown here today that they should be a strong consideration for your power hungry machine.
Advantages
Rock solid +12v rails across the board
Fan noise minimal even after extensive load
Standard ATX size allowing fit in any case
Disadvantages
Cable sleeving not perfect with no cable ties at ends
Cables could be the slightest bit longer
Overclockers Online would like to thank Thermaltake for the Toughpower 700W review sample.