Thermaltake M9 VI1000BWS
Apr 29th, 2008 | By Jared
Thermaltake M9 VI1000BWS
Date
: 04/29/08 – 03:16:03 AM
Author
:
Category
: Cases
Page 1 : Index
Manufacturer:
Thermaltake
Founded in 1999, Thermaltake has grown to be a leader in the power supplies, cases and PC cooling markets. Thermaltake has continued to grow and evolve their PC case line and just about any enthusiast is familiar with their Armor and Xaser line of full size cases.
Today I get to take a look at one of Thermaltake's newest mid tower chassis, the M9 VI1000BWS. This is a mid tower that promises to meet your cooling needs and look good doing it. While full towers tend to be the attention grabbers, mid towers are more widely popular since they have a smaller footprint. Is the M9 worth a consideration for your PC, read on as we explore this stylish enclosure.
Page 2 : Package
Once again I will begin by taking a look at the package.


On the front is the M9 name, with a picture of the case below it. A close up of the side of the front panel dominates the bottom right side. The back of the box gives you two views of the insides with the left panel removed. Some features are listed with the 9 drive bays highlighted.


The sides have a picture of the two different models; the VI1000BNS and VI1000BWS, the difference being the side panel window on the VI1000BWS. Also note that there is a checkbox located at the bottom to indicate if there is a power supply included. The other side just includes text in nine different languages indicating that a computer case is inside and directs you to the Thermaltake website for further details.

The case itself is covered in a plastic bag and then nestled in between two hard Styrofoam shells. There is ample room around the case to thwart all but the most determined of carriers from damaging the case.

Included accessories are a user's manual, 3.5′ bay cover, speaker, cable tie down, locking mechanism, bag of screws and one PCI slot cover.
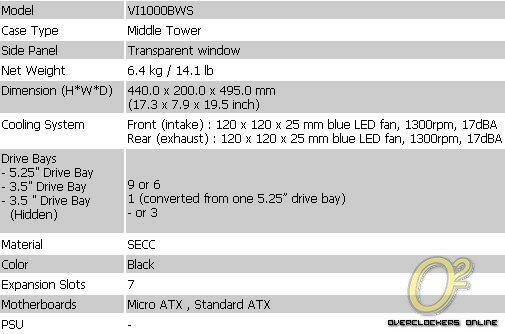
Page 3 : Specifications
Straight from Thermaltake's website, here is a rundown of some of the M9's features and specifications:
Features:
-Glossy finish
-9 Drive Bays – 9 5.25′ drive bay, swappable to 3.5′ drive bay using HDD cage
-High efficiency ventilation: 120mm silent fan in front and rear
-Metal grilled front bezel for maximum air intake
-Air guide and openings on side panel enhance CPU & VGA heat dissipation
-Tool-free installation for 5.25′ drive bays and add-on cards
Specifications:
Page 4 : Exterior
The package and specs are nice, but it's usually the looks of the case that first attracts people.


There is a plastic coating on the window and the shiny black surfaces of the case. Once the plastic coating is removed we get our first clear view of the Thermaltake M9. The general look of the front is becoming quite common lately, with the open mesh covers all along the front.


Looking along the front there are 9 removable drive bay covers with the power and reset buttons located along the top. To the right of the power controls are a mic in jack, headphone jack and two USB ports. I like the way the USB ports are separated, making it easier to use the two USB ports especially if the device or plug is a little wider than normal.

Looking at the back, we have the usual stock I/O panel that generally gets thrown away. I'm honestly surprised to still see cases include them since just about every motherboard has its own custom backplate. There is a 120mm fan for exhaust and you can see there are also mounting holes for 80mm or 92mm fan if you chose to.


The left side is dominated by the window with slots over the CPU and GPU areas. On the right side is a solid panel with a small vented rectangle centered on the bottom.
Page 5 : Interior
Well that's enough about the outside, time to open her up and have a look inside.
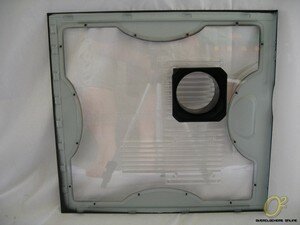
The left side panel is held on by two thumbscrews and is easily removed. There is a duct that is situated over the CPU that can be adjusted in height, though not from vertically or horizontally. The duct can be removed altogether and there are mounting holes for 80mm, 92mm or 120mm fans for both the GPU and CPU. The window is held on by 16 small plastic push pins.


The front panel pulls off and takes a good yank to get off. With the front panel being plastic, I get worried it might break, but it has held up for the many times I have removed it. On the bottom is the 120mm fan attached to the hard drive bay with metal plates covering up all but one of the bays. The top bay has a converter for mounting a 3 1/2′ device such as a floppy drive. The mesh covers come off easily by pushing a plastic tab to the side. Each cover has a removable filter for easy cleaning.


Taking a closer look at the motherboard tray, you can see that Thermaltake uses integrated raised standoffs to mount the motherboard. There are a few extra standoffs included in case you need them. I also want to point out the M9's tool-less system for installing 5 1/4′ devices. I really like their implementation as it allows for adjustment back and forth within each bay.
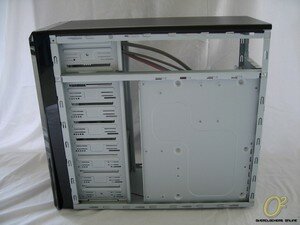
The right side doesn't contain a whole lot of room for cable routing. The area behind the motherboard tray is largely inaccessible without some modding. Also I found that with the side panels removed, the case chassis shows a good bit of flex. It's not the most flimsy case I have seen, but I would not be using this case as a stool!
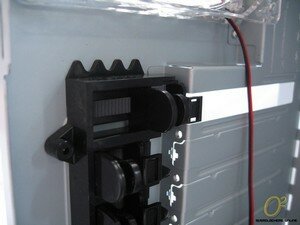
Here is the tool-free system for the PCI slots. You simply squeeze together the two tabs, move it forward and lock the mechanism in place. One thing that disappointed me is that the PCI slot covers are not reusable, they are punched out and once removed they cannot be used again. Kind of disappointing that only one slot cover is included as you could end up with some open slots if you don't have any extras on hand.
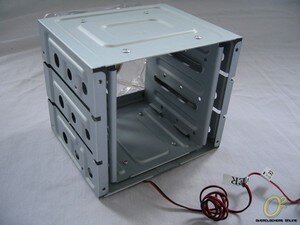
Next we have the hard drive module that holds three hard drives. Mounting the hard drives requires using some screws but the module itself mounts with the tool free design of the case and takes up 3 bays.


Front panel connections include one USB, audio connections with both HD Audio and AC'97, power switch, reset switch, HDD LED and Power LED. Thermaltake has a slightly different approach for the power LED, as they have a 3 pin and a 2 pin pigtailed off of that; allowing for greater compatibility with different motherboard connections.
Ok, field trip is over, now it's time to mount some hardware inside.
Page 6 : Installation
As with my other case reviews, I won't bore you with the tedious details as most readers have put a PC together by now, but rather I will make note of any points of concern.

With the hard drives and motherboard installed, you can see that it is a close fit. You can move the hard drive module higher, but it will be close to components no matter where you install it.
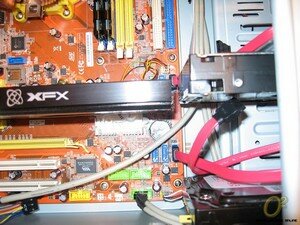
This is an 8800GT installed and it would be impossible to connect the PCI-E power cable and you could forget about installing full size cards like the 9800GTX with it in this position.
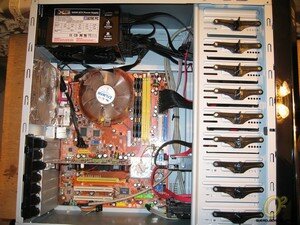
With the full system installed cable management isn't too bad as I am able to hide a bit in the empty 5 1/4′ bays. If you had the bays filled up, cable management would definitely be an issue.


With everything installed and powered up, it certainly is a nice looking case. The blue LED fans light up brightly and I like the blue LED outlining the power button. Looks good, but how does it perform?
Page 7 : Testing
The following system was installed and used to gather temperatures:
CPU: AMD AM2 5000+ Black Edition
MB: Foxconn nForce 570 Sli
RAM: Mushkin 2x1GB PC8400
Video: PowerColor HD 3650
PSU: Ultra X3 1000W
HD: Seagate 1TB SATA
DVD-Rom: LG 18x DVD Burner – SATA
Ambient Temperature: 24-25C
OS: Microsoft Windows XP w SP2
Cases:
Lian Li G70B
Thermaltake M9 VI1000BWS
For stock temperatures the system was allowed to stand at idle for a minimum of 3 hours before temperatures were taken. Load temperatures for CPU and chipset were taken by running the Folding@Home client at 100% for one hour. GPU temperatures were obtained by running 3DMark06 continuously and observing the highest temperature reached.
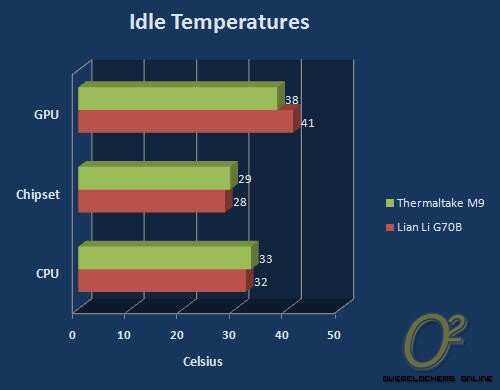
The M9 certainly holds its own and even manages better GPU temps at idle. A definite benefit of mid towers is the ability to keep cool air moving throughout. The GPU also benefits from being directly behind the front 120mm intake fan. Pretty good numbers to say the least, now let's see what happens under load.

Once again the M9 matches the full tower G70B. Overall, some good numbers from Thermaltake's M9.
Page 8 : Conclusion
With cooling performance nearly matching a full tower, the M9 VI1000BWS certainly fulfills Thermaltake's slogan: 'COOLall YOUR LIFE'. The 2 included 120mm LED fans certainly do their job well and with space for up to two more fans on the windows, anyone's cooling needs are surely within reach. With a stylish mesh grill up front and blue LED fans; it is certain to please many with its looks.
If you are into tinkering and swapping out hardware, I don't think the M9 is not for you. I found that it was rather easy to knock loose the bay covers when moving the case and it makes me nervous whenever I have to pop off the front panel. While the M9 is lightweight, it also shows a bit of flex when you put pressure on it. Still with these setbacks, the M9 is still an attractive case with good cooling that can make most anyone happy.

Positives
- Good cooling
- Lightweight
- LED fans
- Window with optional fan mounts
Negatives
- Could be sturdier
- Plastic
Overclockers Online would like to thank Thermaltake for supplying the M9 VI1000BWS for review.
