Cooler Master V8 CPU Cooler
Dec 27th, 2008 | By Chris
Cooler Master V8 CPU Cooler
Date
: 12/27/08 – 03:45:27 AM
Author
:
Category
: Cooling
Page 1 : Index
Manufacturer
: Cooler Master
I have always been very impressed with Cooler Master's products. Cooler Master has just recently released a new series of CPU coolers, ranging among the V8, V10, and V12.

Having recently acquired the V8, I was very excited to test this and anticipated spectacular results. Read on to find out why, and see what the results really are.
Page 2 : Package & Content
The V8 comes in a simple but informative and glossy cardboard box.

Here is the face of the package. Sense the dominating power of the V8 as it towers in front of you, and simply feel the performance by tracing the ‘V8′ with your fingertips…

Shown here are the compatible processor socket types: Core 2 Quad, Extreme, Duo, Phenom, Athlon FX 64 and Athlon X2 64.

And as always, the specifications are printed out on the back. I will go into more detail on this in a few moments.

Let's open the box up and see the contents. Straight out we have the V8 in its plastic protective mold, a very finely detailed instruction manual, and the typical box of mounting brackets.

Here are the mounting brackets for Intel's LGA775 and AMD's 754, 939, 940, and AM2 sockets. As well, we are supplied with a rear I/O plate that fits the fan controller, which is a valuable asset to any heat sink.

Moving on to the specifications…
Page 3 : Specifications
According to the Cooler Master website, these are the exact specifications:

Special features are as listed:
- 4 separate modular sets of aluminum fins create a large heat dissipation surface for unsurpassed cooling performance
- 8 heat pipes maximize heat transfer
- The center mounted 120mm fan blows cool air through the fins of the heatsink and cools down the heatsink which is taking the heat away from the CPU smoothly
- Mirror-finished base makes for 100% contact with the processor
- Adjustable PWM fan speed control, using a manual knob placed in the back of the chassis, enables fan adjustments from 7V to 12V, allowing users to find the perfect balance between
cooling performance and noise level
Let's have a close look at the V8 now.
Page 4 : Exterior
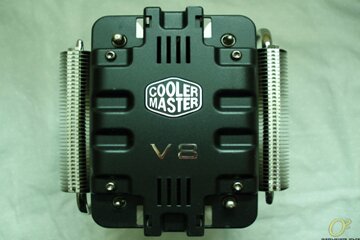
The V8 shows its face proudly before us, and somewhat resembles a real V8 engine block.

This is the right side of the heat sink. The left side looks exactly identical to this. Notice how the inner fin array is horizontal, and the outer aluminum fins are placed vertically.

Between the two sets of heat pipes and their fins, the 120mm fan is positioned to provide optimal airflow.

Flipping the heatsink over, we see the clean, reflective surface of the copper base. Seen by the reflection of the infamous blue thumbtack, the quality of this base is definitely something to make note of. As well, we see the 8 individual heat pipes coming clean out of the base.


Let's keep moving forward and see how easy this heat sink is to install.
Page 5 : Installation
First things first, I applied a coat of the supplied thermal paste. Cooler Master was gracious enough to supply a small tube of silver compound, instead of a small tube of cheap, generic ceramic paste. Funny thing was, when I popped the cap off the tube, most of the paste came shooting out and was wasted. Thankfully there was enough left in the tube for one application. Also a quick note: the V8 did not obstruct any expansion slots, DIMM slots, nor power connections.

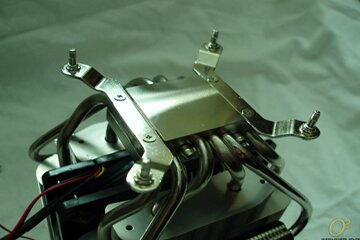
The next step is screwing on the appropriate adapter that works for your processor socket type. This one is for the LGA775.

Then, you line up the screws with the holes, slip it down on top of the processor, and thread the nuts on.

And here is the final product! Do you sense the power held within yet?

Cooler Master has never let me down. Included alongside the V8 is this simple fan adjuster, placed in a rear I/O expansion slot. This can adjust the 120mm fan to speeds of 800 to 1800 RPM.


When placed inside the tower, the V8 really shows its stature.

Now that it is installed, let's see if it performs as well as it displays.
Page 6 : Testing and Performance
The following system configuration will be used to test the V8's cooling capabilities:
Control:
- XFX nForce 780i SLI
- Cooler Master Cosmos 1000
- Intel C2D 6750 @ 2.66GHz, OC'd to 3.60GHz (Intel SpeedStep disabled)
- OCZ EL Platinum Rev.2 2x1024MB @ 5-6-5-16, 450MHz
- OCZ GameXStream 700W
- eVGA e-GeForce 8800GT @ 650/1620/950MHz
- Scythe Mugen
- Seagate Barracuda 250GB
Coolers
-
Cooler Master's V8 (with fan speeds at 800 and 1800 RPM)
- Scythe Mugen
- Thermalright IFX-14
For the test, I will have the C2D 6750 run idle for one hour. Once the hour is done, I will record the temperature of the CPU core using Everest Ultimate Edition. I will then stress the CPU with SP2004 for one hour. Temperatures will be recorded again. The temperature of the C2D 6750 will be recorded with use of the following heat sinks:
The ambient room temperature was ~19 degrees C.
Here are the results:

The performance put out by the V8 blew me away. At 1800 RPM, it out-shone the other contestants. And at 800 RPM, it performed nearly on par with the others, and was definitely the ‘audible’ choice as I couldn't even hear the fan running. On the other end at 1800 RPM, the fan made a distinguishable whirring noise; definitely not a jet engine, but not exactly a silent whisper either. As well, keep in mind that the C2D 6750 was running at 3.6GHz.
Page 7 : Conclusion
In the end, I was very impressed with the Cooler Master V8's performance. Using a total of 8 heat pipes, it makes a strong impression on any enthusiast's heart. The build was solid, installation was a breeze, and it looks very impressive inside of the tower.
Who would I recommend this cooler to? This product isn't for the everyday computer user; it was designed from the bottom up with the enthusiast in mind.

Advantages
- Quick installation
- Rear mounting plate for added support
- Superior performance
Disadvantages
- Expensive
- Large and Heavy
Overclockers Online would like to thank Cooler Master for making this review possible.