ThermalTake ProWater 850i Liquid Cooling System
Jun 20th, 2008 | By Jared
ThermalTake ProWater 850i Liquid Cooling System
Date
: 06/20/08 – 03:35:45 AM
Author
:
Category
: Cooling
Page 1 : Index
Manufacturer:
Thermaltake
While Thermaltake is certainly known for their many computer cases, they also have a large line of cooling products. From GPUs to CPUs and air to water cooling they have products for just about any need.
While Thermaltake's BigWater line is quite familiar to most, they have launched a new all in one water cooling kit, called the ProWater 850i that I have on deck to review today. Differing from most of the BigWater line, the ProWater 850i more closely resembles the do-it-yourself kits with separate components but still offers the ease of installation of the BigWater kits. Let's continue on and explore what this water cooling kit has to offer.
Page 2 : Package
While it seems that everything these days come packaged with black as the main color, it's a nice change to see different colors to mix things up.

If you have seen the packaging on most of Thermaltake's water cooling kits, the ProWater 850i is a familiar sight. You have a clear view of the radiator, pump and reservoir through the front window. There is also a picture of the system assembled to demonstrate how the unit works. Included on top is a carrying handle to make toting the large package easy.

The back of the package lists details on some of the features of the system. There are a few pictures of how the ProWater 850i will look assembled inside a case.


The sides of the package list out the features and specifications in more detail, which we will cover more shortly.
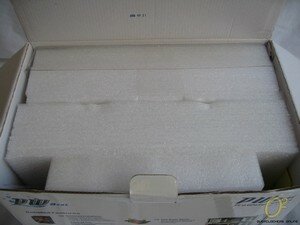
Once you open up the top there are two foam sections containing the various components and parts.


One section holds the radiator, water block, pump/reservoir and flow meter. The other section contains the coolant, box of hardware and the tubing. Tubing is settled in the other side of the section containing the coolant and box of mounting hardware.
Page 3 : Specifications
I grabbed the specifications directly from Thermaltakes product page
here
.
Water Block:
Dimensions – 58mm(L) X 58mm(W) X 35mm(H)
Material – All copper designed
Tubing & Hoes Clip – For 9.5mm ID (3/8′) tubing
Weight – 336(g)
Pump:
Dimensions – 75(L) x 70(W) x 75(H) mm
Bearing – Ceramic bearing
Maximum Capacity – 500 L/ hr
Rated Voltage – DC 12V
Input current – 600 mA
Connector – 4 pin
Noise – 16 dBA
Life time – 80000 hr (MTBF)
TMG Radiator:
Dimensions – 153(L) x 120(W) x 28(H) mm
Material – Aluminum
Tube Design – Aluminum, Dimple
Fin Design – Aluminum, Louvered
Tubing & Hoes Clip – For 9.5mm ID (3/8′) tubing
Fan:
Fan Dimension – 120(L) x 120(W) x 25(H) mm
Fan Speed – 1300 ~ 2400 RPM
Noise – 16 ~ 30 dB
Fan Connector – 4 pin
Liquid Tank:
Dimensions – 86(L) x 66(W) x 110(H) mm
Capacity – 350 cc
Tubing & Hoes Clip – For 9.5mm ID(3/8′) tube
iStripe:
Length – 300 mm x2 pcs
Material – TPU
Flow TX:
Dimensions – 60mm(H) x 35 mm (W) x 25 mm (D)
Tubing & Hoes Clip – For 9.5mm ID(3/8′) tube
Tube:
Dimensions -9.5mm ID(3/8′) tube
Material – Green UV
Coolant:
Capacity – 500 cc
Major Material Ingredient – Propylene Glycol
Application:
CPU – AMD AM2 series
AMD K8 series
Intel LGA775
Intel P4
Page 4 : Contents
Time to dig into the unit itself.


First up is the reservoir and pump unit. As we saw in the specifications, the pump is rated at 500 liters per hour while only producing 16dB of noise. The pump uses a 4-pin Molex connector for power and includes a 3-pin header for RPM monitoring. The attached reservoir effectively combines two parts into one unit and holds 350cc of fluid.


The 12cm radiator features Thermaltakes Dimple Tube Technology which helps to swirl the coolant inside the radiator and increase the cooling. The attached 120mm fan includes a 4-pin molex for power with a 3-pin for RPM monitoring along with a fan speed controller.
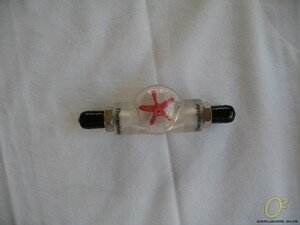
The flow meter is more or less a visual indicator that the liquid is circulating through the system. No audible alarms are hooked up so unless the meter is visible with your case closed (such as with a window) it really isn't all that useful to regulate water flow on a normal basis.


The waterblock is made of solid copper and the weight confirms it. The mounted H clip has holes to accommodate sockets from Intel and AMD from socket 479 and socket 754 on up. The bottom of the block has a mirror finish with a raised circular center.
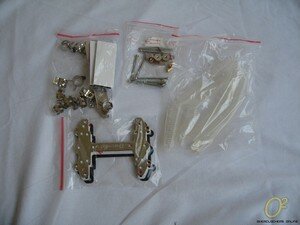
Inside a box are 3 bags containing all of the necessary mounting hardware and hose clips. The fourth bag contains Thermaltake's iStripe, used to help prevent kinks in the hoses and eliminate deformation of the tubes over time.

Wrapping up the package contents is the 3/8′ diameter UV reactive tubing, bottle of coolant and the user's manual. The manual contains instructions in nine different languages.
Page 5 : Installation
One of the things that the all in one water cooling kits have is ease of installation.


Installation begins with assembling the H type clip and installing it on the motherboard. It's a simple process though it is a bit tedious threading the nuts down the screws to secure it to the motherboard.

Next you simply apply a layer of thermal paste and mount the water block using the included thumbscrews. Since the H clip is positioned up high, clearance on the motherboard should not cause any issues with motherboard hardware.


Next you remove the 120mm exhaust fan and mount the radiator in its place. There was a slight problem with clearance with the radiator and the separating partition on the Tagan Black Pearl WCR but I was able to work around it by removing the mounting bracket from the radiator. After situating the pump and reservoir it was time to start cutting and connecting the tubing.

This step actually turned out to be a breeze and only took about 10 minutes. I ended up using a piece of iStripe on only one section since it was a rather tight corner. Even after installing the entire unit there is still enough tubing for close to two more installations, so there are no fears of running out.

Next came filling the unit and testing for leaks. This is one area I wish Thermaltake would spend a little more time on. A leak test is rather important when installing a water cooling kit and Thermaltake includes no instructions on how to perform this and it isn't even mentioned in the instruction book. There is a pamphlet included in the box that states they recommend assembling the unit outside the case to check for leaks, but this is a step that may be missed by beginners and could be disastrous if there is a leak.

With the system all put back together and leak free, it's time to run some tests.
Page 6 : Testing
The following system was installed and used to gather temperatures:
CPU: Intel E4300 @ 2.9 GHz
MB: Gigabyte P35-DS3R
RAM: G.Skill 2x2GB PC6400
Video: PowerColor HD 3650
PSU: Ultra X3 1000W
HD: WD 40GB IDE
DVD-ROM: Lite-On 18x DVD Burner – SATA
Cases: Tagan Black Pearl WCR
OS: Microsoft Windows XP w/ SP2
Ambient Temperature: 24-25C
Comparison Coolers:
Stock Intel HSF
Thermalright Ultima90 w/Yate Loon D90BM-12
Thermaltake ProWater 850i
For idle temperatures, the system was allowed to stand at idle for 3 hours before temperatures were taken. To achieve load temps, Prime95 was run for three hours and the average peak temperature was recorded. I am including testing with the radiator fan at both the highest and lowest setting.

As you can see all of the coolers are pretty much even at idle temps but when a load is place on the CPU we see the PW850i and Thermalright Ultima90 easily outmatch the stock Intel cooler. While the sound of the unit is pretty quiet at low settings, at high the fan is pretty loud and is not worth the extra noise for a mere 2 degree drop. Temperatures are decent and are a definite improvement over the stock cooler, but it takes turning it up to high (and noisy) levels to match the performance of the Thermalright Ultima90.
Page 7 : Conclusion
The ProWater 850i was an extremely easy unit to set up and is an ideal unit for an inexperienced user looking to test out the waters of liquid cooling. On low the PW850i is near silent and produces decent temperatures that easily beat stock cooling.
However when the radiator fan is set to high, the noise increases dramatically but results don't seem to reflect this increase in air flow. Ultimately, the ProWater 850i has the same problem most all-in-one kits suffer: performance that is either equaled or beaten by a good air cooler.
So if you are new to water cooling and want to test out the waters but don't want to spend a lot of money trying it out, the ProWater 850i is an ideal product. Easy to install and assemble, it just might get you hooked on the once fringe art of liquid cooling and the silence it can offer.

Positives
- Easy installation
- Quiet operation on low
- All in one kit
- Inexpensive for liquid cooling
Negatives
- Loud on high
- Lackluster cooling when compared to aftermarket air coolers
Overclockers Online would like to thank Thermaltake for supplying the ProWater 850i for review.