The Romeo Case
Jul 14th, 2001 | By Archive
The Romeo Case
Date
: 07/14/01 – 08:39:28 PM
Author
:
Category
: Cases
Page 1 : Intro
When asked if I'd be interested in receiving a computer case for review, I thought, "sure!". I had heard of Color Cases before briefly, and took a look at their website. Sure enough, they are the guys that make those little animal style cases, where the 5.25" drive bays look like big teeth. Interesting. Not knowing which case I'd be getting, I decided to wait it out until it got here to find out for myself. I came home from work one day, and there it was.
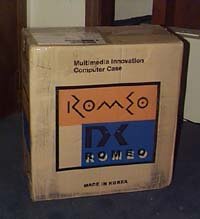
The box itself seemed relatively heavy for a mid-size case these days, less than 30lbs. I lugged it into my testing area(read: bedroom), and dropped it on the floor. Immediately I tried to rip the thing open. No dice. The tape fought me the whole way. Instead of ripping, it just stretched and stretched. Finally, I just decided to go get some scissors and do it right. Alright. The box was now open. I take the thing out; first thing I do is pick it up and handle it. It seemed pretty sturdy, and at 25lbs, was heavy enough to hurt my foot if I dropped it on that particular appendage. What now? Time to open the thing up! Alright, no problem…I think. How the heck do you get this thing open? There are a couple little plastic flaps that open up near the front on both sides. They go up and down. Now what? I couldn't figure it out, so I decided to go to the website and see what's up. I get there, go to the page for the 403, and lo and behold there is a little mpeg movie demo thing right there. Jackpot?
Upon opening, it shows a guy's hands, and he reaches for the flaps. He pulls them up, jimmies the case a little, and out slides the cover. Sweetness. He then pulls out this sliding motherboard tray too, and slides it back and forth a couple times for good luck. That was some good thinking on Color Cases' part. So I go to it myself with a new passion. After a few unsuccessful attempts, I knew I needed a little leverage, as pulling the cover just pulled the whole case along. So I grabbed the back on the chassis part and pulled. That worked. I played with the motherboard tray a bit too. I had no problems taking the thing out, but putting it back in, it kept catching itself on the metal, and when pushing it in, I had to align it just so, so that it wouldn't catch. It's something to think about if you have delicate hardware that you don't want to jostle around too much.
That's about all I did that day. Here are a few images I snatched off the Color Cases website of the case in action. I tried to get as many shots as possible, but I didn't get any as good as these. The left one shows the cover being taken off, while the right one shows the motherboard tray en route to the back of the case.

Page 2 : Setting Up
The next day after work, I decided I would transfer the contents of my current case, the Enlight EN-7237. I've had the case since early '99, and it has served me well so far. It originally came with a 250W power supply which I busted in a rather sucky incident involving a large fan and a turned on computer. I later bought a stand-alone 300W something or other a little later.
Anyway, I turned the thing off, and disconnected everything. I cleared some heavily cluttered floor space and set to work. I noticed a couple things about the new case right off the bat. One was that it comes with spaces for two 80mm fans, the other was that it only came with two connectors coming out of the power supply. My old power supply had 3, so I was used to that. I have a bunch of fans in my case, plus several drives that needed power. So I was a little curious to see if I would be able to hook everything up. It turned out I could. I needed to plan a little more carefully how I wanted to set it all up, but it worked out in the end.
The first thing I did was to install the motherboard. The case comes with some neat little motherboard fasteners, that, instead of screwing them in, you press the sides together and stick them in the holes. Those screw fasteners that I had on my old case were often quite annoying. Sometimes when you tried to unscrew the motherboard, they unscrewed with it, and you had a mess on your hands. This way, you don't have to worry about that.
After installing the motherboard, I went about getting the case fans installed. Something to note is that my case came with a free 80mm fan, though I believe this was just a June special, so you may not want to count on that if you order this case. Something else to note is that the fan didn't come with any screws! Did they expect me to come up with my own long thin screws here? I do have a bunch of screws around, but I was unsettled nevertheless. I found some that fit, but not without using a bolt on the other side to keep it in place. Here's a little picture to give you an idea.

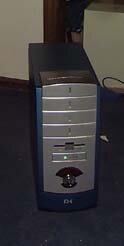
So I had all of my hardware installed. My IDE/floppy drives were in there too, though not for long. I plugged everything back in, and the computer started up on the first try like a champ. So I shut down to try and put on the cover. No problems at first, but once I get the thing almost all the way slid into place, it sticks. I looked at the front, and the floppy is stuck out too far. I adjusted the floppy a little, and tried again. This time I got it on there. I booted it up, and everything worked fine. The only problem was the floppy drive. My floppy is designed slightly differently than most. The release button is wider and flatter. It doesn't come out as far as most. This caused a problem with the floppy opening they have built-in on the case. The problem was that I couldn't get a floppy out once I put it in there. So I had to take the cover off again and put the floppy in the slot below. Here's a picture of the finished case.

Page 3 : Specs and Conclusion
Here are the specifications, and other details that you'll probably want to look at.
Specifications
- Motherboard Type: ATX, or Extended ATX or Pentium IV
- Construction: Steel with Aluminum Coating on the Front Panel
- Cooling Fans: Optional Two 80mm fans can be installed
- Motherboard Mounting Kits: Included
- Hard Drive & Power LEDS: Included
- Total Bays: 6
- External Bays Available: 3 x 5.25"; 2 x 3.5"
- Internal Bays Available: 1 x 3.5"
- Dimension (H x W x L): 21" x 10" x 20"
- Number of slots: 7
- 25 LBS with POWER SUPPLY
Features
- ATX Form Factor Mid-Tower Case
- Universal ATX I/O Shield
- Removable Motherboard Tray
- Electro magnetically Shielded
- Electromagnetic interference protection
- Fit any standard ATX or Pentium IV Power Supply
- Built-in extra two 80mm quiet Fans available
- Tool-less Slide Out Access (Push two tabs in the front of a case and pull out the front cover towards front.)
Temperature Stuff
So, do the two case fans really help? Well, they don't hurt. I like the fact that the additional case fan is located right next to the CPU, so you can just blow cold air from outside right onto the CPU. Here's a little picture to show you exactly where it is.

I've been tracking motherboard and CPU temperatures for the past week or so, with the cover on, and with it off. I also tracked temps with the 7237, and there was no really noticeable difference. Running a CPU stresser like RC5 or prime95 made the temps go up about the same as with my other case.
There is a good thing here though. I used to run the 7237 with the cover off all the time. Using the cover usually made the temps rise several degrees(4 or 5 or more), so I almost always had the cover off. In the 2 years that I owned the case, I think the cover might have been on there less than a week. With this Romeo case, however, I've got the cover on now, and there is almost no noticeable difference with the cover on and off. Maybe 1 or 2 degrees tops. That's definitely a good thing.
Conclusion
It's a nice looking case. Aesthetically pleasing. Not only that, but it is made well and strong. The extra space made for the extra case fan is also a plus. Buying a computer case is often not an easy thing. There are so many out there that offers pretty much the same thing for about the same amount of money that it is difficult to choose. For $87, Color Cases "Romeo" is a good bet. I seriously doubt you'll be let down with this purchase, though if you're a little strapped for cash, I would go for something a bit cheaper. I bought my Enlight 7237 2 years ago for $55, and it has lasted me a long time. I probably would have kept using it for a long time if I hadn't started using this Romeo case. Speaking of keep the case for a while, I haven't mentioned that this case is "P4-Ready". I imagine this means you will be able to get a P4 motherboard in here working. With that in mind, it could really go the distance for you. Keep this case in mind when you go shopping for your next one.
A couple more pictures

