|
Connecting Cables |
 |
Connect the power cord for your monitor to the POWER port on the back of the monitor.
Plug the power cord for the monitor into a nearby outlet. |
 |
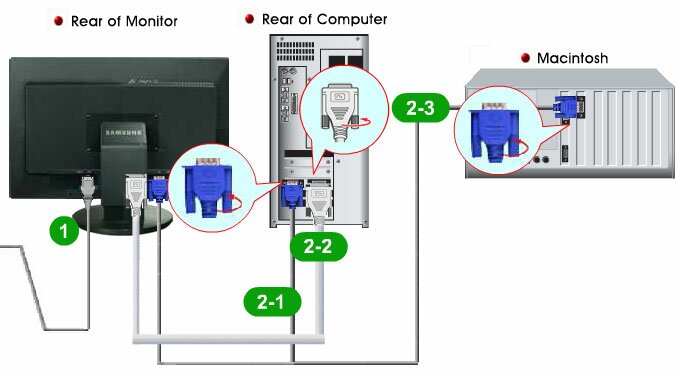
Use a connection appropriate for your computer. |
| |
 |
Using the RGB (Analog) connector on the video card.
- Connect the signal cable to the 15-pin, RGB port on the back of your monitor.
 [ RGB ] [ RGB ]
|
 |
Using the DVI (Digital) connector on the video card.
- Connect the DVI cable to the DVI(HDCP) port on the back of your monitor.
 [ DVI(HDCP) ] [ DVI(HDCP) ]
|
 |
Connected to a Macintosh.
Connect the monitor to the Macintosh computer using the RGB connection cable. |
|
 |
If the monitor and the computer are connected, you can turn them on and use them. |
|
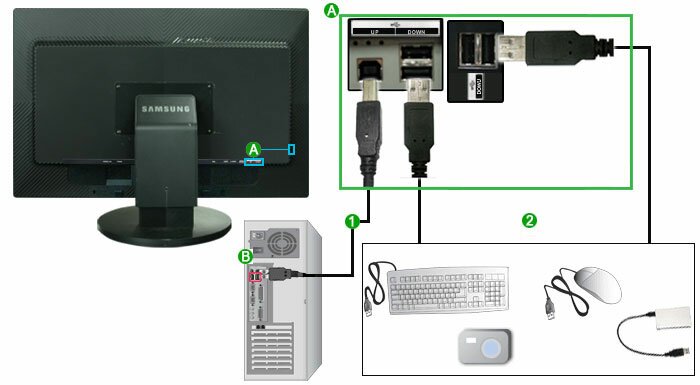
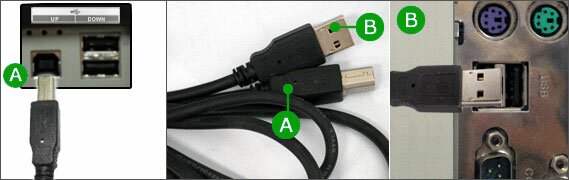
Connect the  UP port of the monitor and the USB port of the computer with the USB cable. UP port of the monitor and the USB port of the computer with the USB cable. |
|
To use DOWN port, you have to connect the UP (Upstream Cable) to the PC. |
|
Make sure to use the USB cable supplied with this monitor to connect the monitor's UP port and your computer's USB port.
 |
|
Connect the DOWN port of the USB monitor and a USB device with the USB cable. |
 |
The use procedures are as the same as those for using an external device connecting to the PC.
- You can connect and use a keyboard and mouse.
- You can play a file from a media device.
(Examples of media devices: MP3, digital camera, etc.)
- You can run, move, copy or delete the files on the storage device.
(Examples of storage devices: external memory, memory card, memory reader, HDD-type MP3 player, etc.)
- You can use other USB devices that can be connected to a computer.
|
|
|
When connecting a device to the DOWN port of the monitor, connect the device using a cable appropriate to the device.
(For the purchase of the cable and external devices, ask the service center of the corresponding product.) |
|
The company is not liable for problems or damages to an external device caused by using an unauthorized cable for the connection. |
|
Some products do not follow the USB standard, and it may cause a malfunction of the device. |
|
If the device malfunctions even if it is connected to the computer, contact the service center of the device/computer. |
|
|
 |
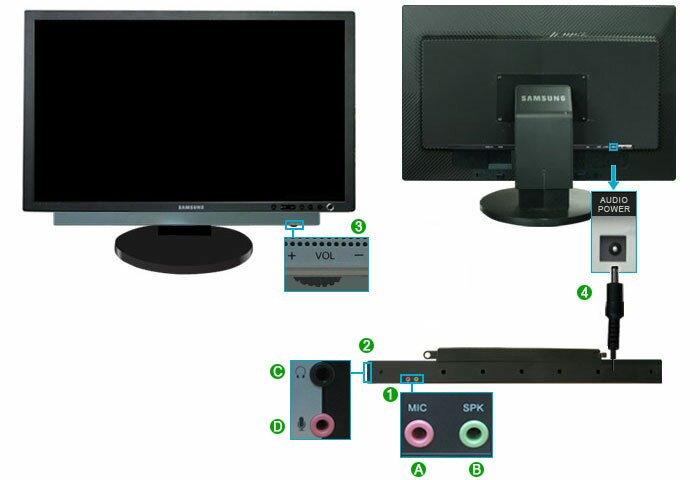
Connecting a Speaker |
|
|
|
|
When connecting a speaker, be careful that the grooves of the monitor and the speaker .
( )are aligned with each other. )are aligned with each other.
Adjust the aligned positions until you hear a click. If a speaker is connected correctly, you can hear a click.If a speaker is connected without you hearing a click, the holding part may become damaged. |
|
If you need to separate, please pull ( ) a little and push to the right. ) a little and push to the right. |
|
|
| |
 |
|
MIC / SPK |
| |
|
Connect the red cable of the cables provided when the speaker was purchased to the audio output terminal at the back of the computer.
Connect the other end of the cable to the red terminal at the back of the speaker. |
| |
|
|
Connect the light green cable of the cables provided when purchasing the speaker to the audio output terminal at the back of the computer.
Connect the other end of the cable to the light green terminal at the back of the speaker. |
|
|
 / /  |
| |
 |
Connect a headphone to the black terminal at the right of the speaker. |
| |
|
 |
Connect a microphone to the red terminal at the right of the speaker. |
|
|
By turning part ( + , - ) in the direction shown in the figure below, the speaker turns on and the volume increases. |
 |
Connect the power line connected to the speaker to the black terminal of the monitor.
This speaker is not connected to an external power source. It is connected to a monitor for the required power. |
|
|
Connecting to Other devices |
|
This monitor allows the user to connect it to such input devices as a DVD player, a VCR or a camcorder without disconnecting the PC. |
|
The configuration at the back of the monitor may vary from product to product. |
|
|
|
Connecting AV Devices |
|
The monitor has AV connection terminals to connect AV input devices like DVD, VCR or Camcorder. You may enjoy AV signals as long as the monitor is turned on. |
|
 |
|
Input devices such as DVD, VCR or Camcorder are connected to the RCA or S-VIDEO terminal of the monitor using the RCA or S-Video cable.
Then, start the DVD, VCR or Camcorder with a DVD disc or tape inserted.
Select AV or S-Video using the SOURCE. |
|
|
|
|
Connecting Digital DVD |
|
The monitor has DVI IN connection terminals to connect DVI input devices digital DVD. |
|
 |
|
Input devices such as digital DVD are connected to the DVI IN terminal of the monitor using the DVI cable.
Then, start the DVD with a DVD disc inserted.
Select Digital using the SOURCE button. |
|
|
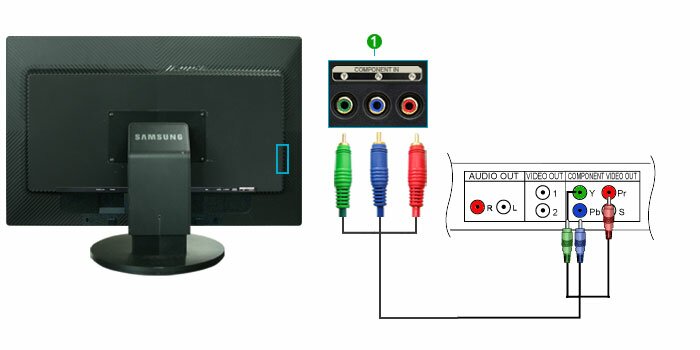
Connecting DVD/DTV Set Top Box |
|
Connect to the DVD/DTVSet Top Box input if the device has a DVD/DTV connector.
You can watch Component simply by hooking up the Component with the monitor as long as the power is on. |
|
 |
|
Connect the VIDEO OUT port of the DVD / DTV Set-Top Box to the PR, PB, Y input ports using a component video cable (PR, PB, Y).
Then, start the DVD with a DVD disc inserted.
Select Component using the SOURCE button. |
|
|